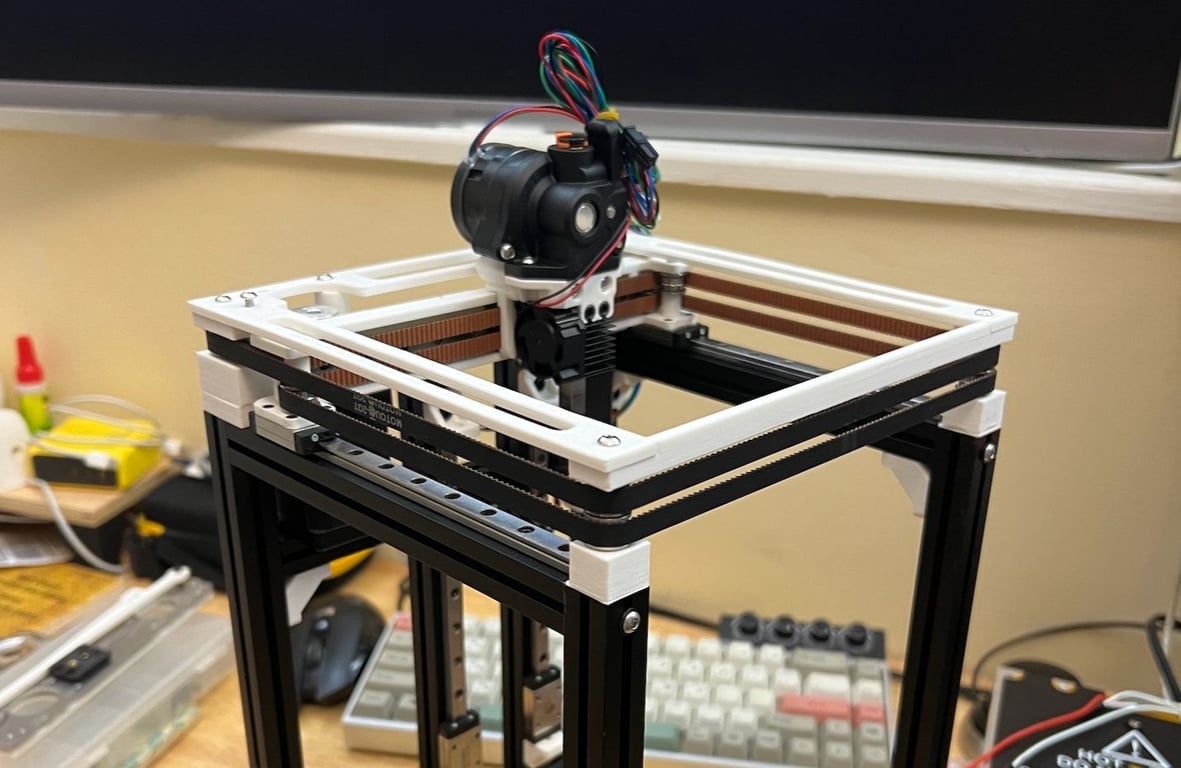
Halcyon Mini: Ultra-Compact Direct-Drive 3D Printer
An ultra-compact CoreXY 3D printer design with a 35% smaller footprint and 50% smaller overall volume than the Voron V0 with the same usable print size
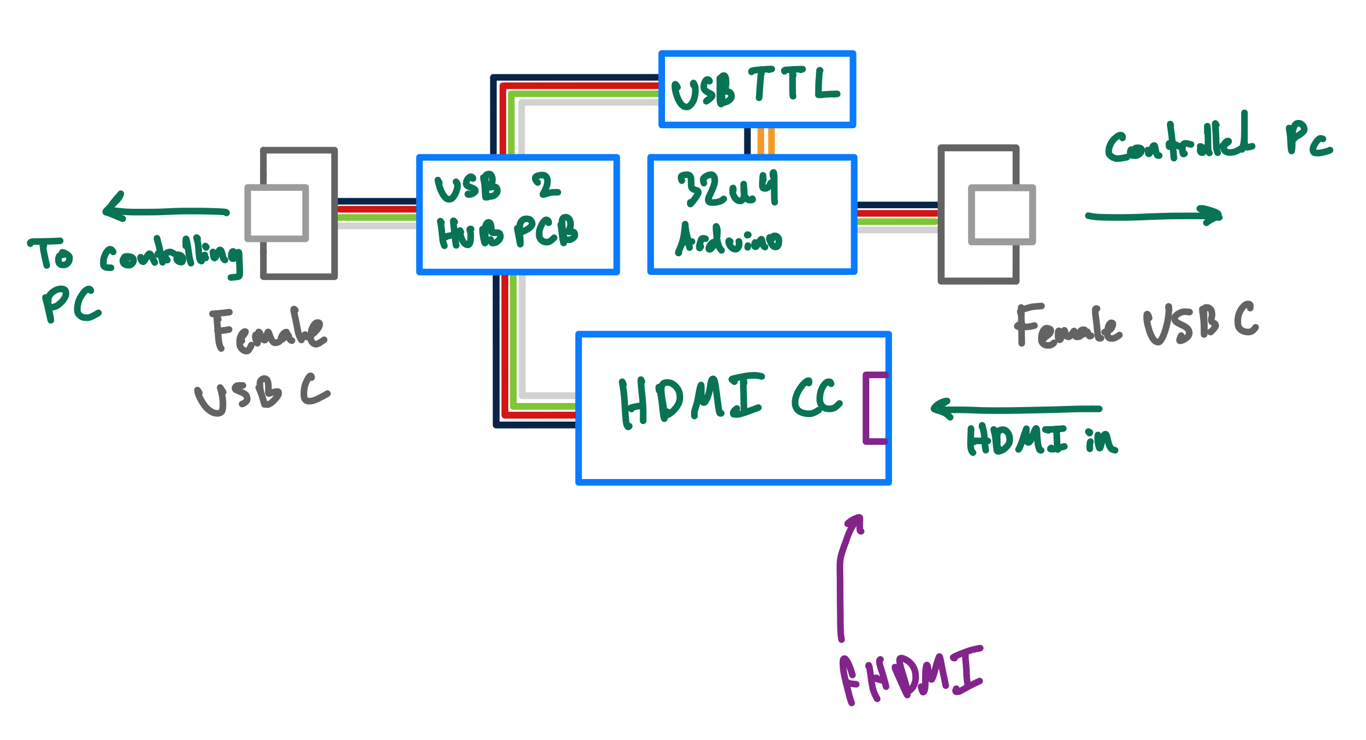
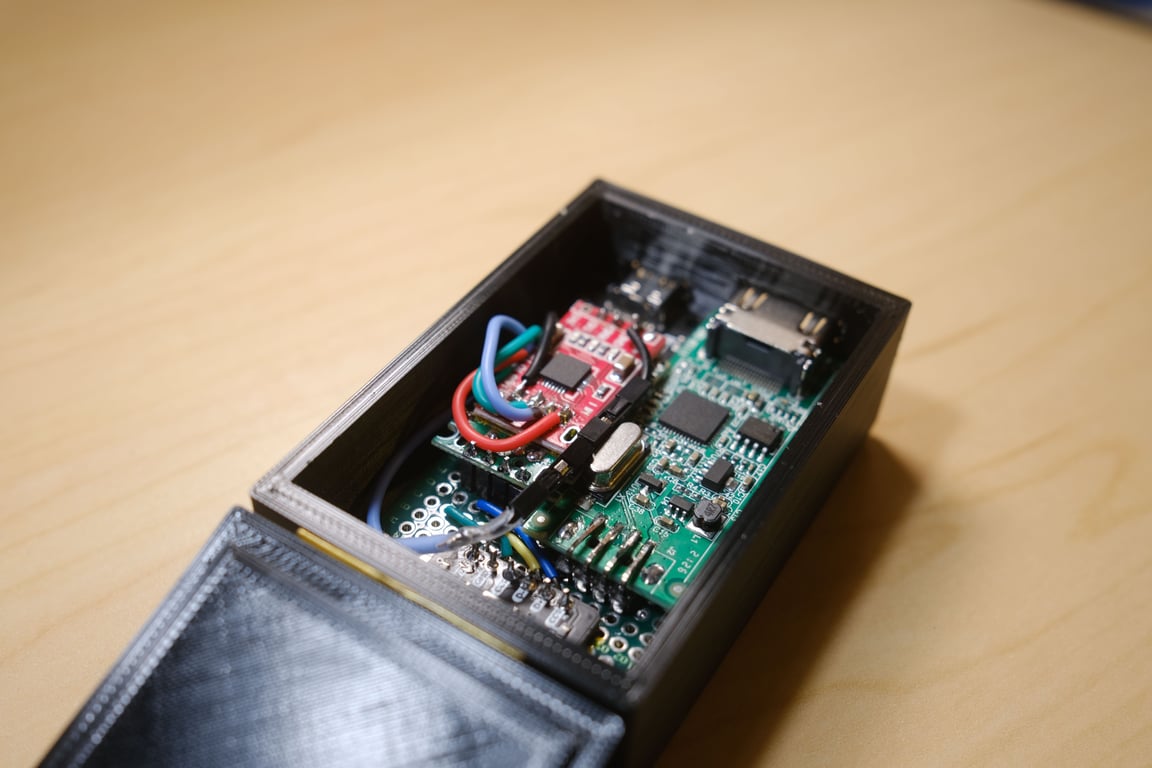
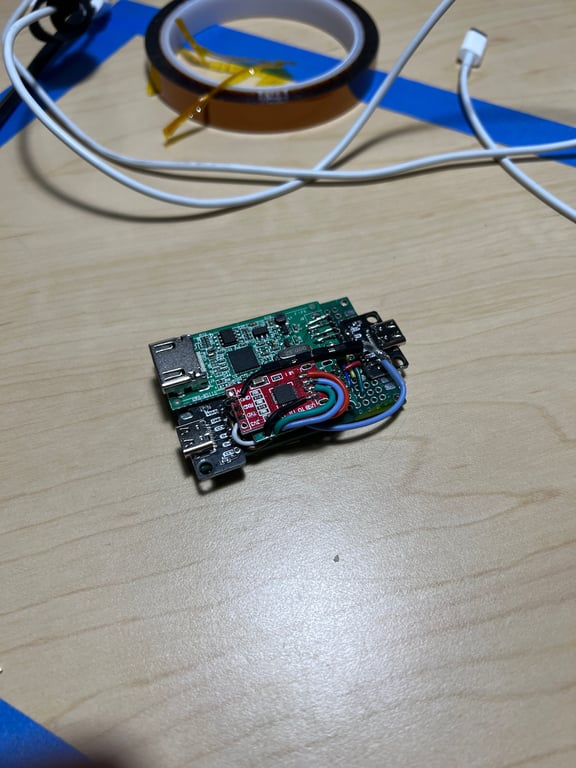
Plug your laptop into another computer, and use it like a keyboard, monitor and mouse
To-do:Full Mouse Supportleft/right/middle click workingsend commands to serial adapterinterpret properly with ArduinoOnly send mouse movement+clicks+keyboard when within window and within camera areaMake mouse movement stick within the camera window areamodify the window_focused code, I’ll bet. Probably go with making it check if the main window is in focus, if not, send nothing
this will fix the whole “can’t physically paste” issueyepnow maybe streamline that code a bit?Full Keyboard Supportkeyboard hooking (support alt+tab), etconly send keyboard when window is focusedKeyboard mapper scripthandle file being donestart buttonmap keysundo buttonneed to make this update the “file output” boxpause/stop buttonsfix serial communication issues (need a start byte or checksum)add a “checksum” byte:either figure out how actual checksums work, or use a specific start byte (or two bytes, to be safe?)Proper Hardware Integrationre-add COM selection dropdown at top of windowauto-selects device!add hardware type dropdown in settings (serial adapter model). could also be text box with default, idk^now I need to make that persistent, so json settings file it is!open video capture pre-set to properly detect the HDMI capture cardalso dropdown, just in case.Other Features/fixescopy to host (via OCR)paste from hostKeyboard remapper script (GUI-based)back button to undo previous assignemntMigrate settings and states from global variables to classes!Settings:persistent .yaml settings file“save settings as default” buttonper-setting default indicator
- PrusaSlicer-esque - setting indicates if it’s not default, but adds button to set it as a default
Allow Resizing - should make all the scaling numbers factors of the window size, if that makes sensefigure out texture resizing for the camera feed (720p no matter what, but can scale up/down for window sizing reasonsdrag to resize shouldn’t get smaller than camera feedDPI scaling awareness (should influence manual scaling, probably)try to get upscaling working or something? might need to mess around with text size)should we try to render at higher res but show the same size? ideallyAdd “full reload” to re-draw window if necessaryoption to backup configfurther UI customizationFont optionsIn-depth color options?color themesStyle pointsPackage as .exe (portable or installer)include all the required dependenciescase designPCB design (headers for pre-made bits)
~$ v4l2-ctl --list-formats-ext

ioctl: VIDIOC_ENUM_FMT
	Type: Video Capture

	[0]: 'MJPG' (Motion-JPEG, compressed)
		Size: Discrete 1920x1080
			Interval: Discrete 0.017s (60.000 fps)
			Interval: Discrete 0.033s (30.000 fps)
			Interval: Discrete 0.040s (25.000 fps)
			Interval: Discrete 0.050s (20.000 fps)
			Interval: Discrete 0.100s (10.000 fps)
		Size: Discrete 1600x1200
			Interval: Discrete 0.017s (60.000 fps)
			Interval: Discrete 0.033s (30.000 fps)
			Interval: Discrete 0.040s (25.000 fps)
			Interval: Discrete 0.050s (20.000 fps)
			Interval: Discrete 0.100s (10.000 fps)
		Size: Discrete 1360x768
			Interval: Discrete 0.017s (60.000 fps)
			Interval: Discrete 0.033s (30.000 fps)
			Interval: Discrete 0.040s (25.000 fps)
			Interval: Discrete 0.050s (20.000 fps)
			Interval: Discrete 0.100s (10.000 fps)
		Size: Discrete 1280x1024
			Interval: Discrete 0.017s (60.000 fps)
			Interval: Discrete 0.033s (30.000 fps)
			Interval: Discrete 0.040s (25.000 fps)
			Interval: Discrete 0.050s (20.000 fps)
			Interval: Discrete 0.100s (10.000 fps)
		Size: Discrete 1280x960
			Interval: Discrete 0.017s (60.000 fps)
			Interval: Discrete 0.033s (30.000 fps)
			Interval: Discrete 0.040s (25.000 fps)
			Interval: Discrete 0.050s (20.000 fps)
			Interval: Discrete 0.100s (10.000 fps)
		Size: Discrete 1280x720
			Interval: Discrete 0.017s (60.000 fps)
			Interval: Discrete 0.020s (50.000 fps)
			Interval: Discrete 0.033s (30.000 fps)
			Interval: Discrete 0.050s (20.000 fps)
			Interval: Discrete 0.100s (10.000 fps)
		Size: Discrete 1024x768
			Interval: Discrete 0.017s (60.000 fps)
			Interval: Discrete 0.020s (50.000 fps)
			Interval: Discrete 0.033s (30.000 fps)
			Interval: Discrete 0.050s (20.000 fps)
			Interval: Discrete 0.100s (10.000 fps)
		Size: Discrete 800x600
			Interval: Discrete 0.017s (60.000 fps)
			Interval: Discrete 0.020s (50.000 fps)
			Interval: Discrete 0.033s (30.000 fps)
			Interval: Discrete 0.050s (20.000 fps)
			Interval: Discrete 0.100s (10.000 fps)
		Size: Discrete 720x576
			Interval: Discrete 0.017s (60.000 fps)
			Interval: Discrete 0.020s (50.000 fps)
			Interval: Discrete 0.033s (30.000 fps)
			Interval: Discrete 0.050s (20.000 fps)
			Interval: Discrete 0.100s (10.000 fps)
		Size: Discrete 720x480
			Interval: Discrete 0.017s (60.000 fps)
			Interval: Discrete 0.020s (50.000 fps)
			Interval: Discrete 0.033s (30.000 fps)
			Interval: Discrete 0.050s (20.000 fps)
			Interval: Discrete 0.100s (10.000 fps)
		Size: Discrete 640x480
			Interval: Discrete 0.017s (60.000 fps)
			Interval: Discrete 0.020s (50.000 fps)
			Interval: Discrete 0.033s (30.000 fps)
			Interval: Discrete 0.050s (20.000 fps)
			Interval: Discrete 0.100s (10.000 fps)
	[1]: 'YUYV' (YUYV 4:2:2)
		Size: Discrete 1920x1080
			Interval: Discrete 0.200s (5.000 fps)
		Size: Discrete 1600x1200
			Interval: Discrete 0.200s (5.000 fps)
		Size: Discrete 1360x768
			Interval: Discrete 0.125s (8.000 fps)
		Size: Discrete 1280x1024
			Interval: Discrete 0.125s (8.000 fps)
		Size: Discrete 1280x960
			Interval: Discrete 0.125s (8.000 fps)
		Size: Discrete 1280x720
			Interval: Discrete 0.100s (10.000 fps)
		Size: Discrete 1024x768
			Interval: Discrete 0.100s (10.000 fps)
		Size: Discrete 800x600
			Interval: Discrete 0.050s (20.000 fps)
			Interval: Discrete 0.100s (10.000 fps)
			Interval: Discrete 0.200s (5.000 fps)
		Size: Discrete 720x576
			Interval: Discrete 0.040s (25.000 fps)
			Interval: Discrete 0.050s (20.000 fps)
			Interval: Discrete 0.100s (10.000 fps)
			Interval: Discrete 0.200s (5.000 fps)
		Size: Discrete 720x480
			Interval: Discrete 0.033s (30.000 fps)
			Interval: Discrete 0.050s (20.000 fps)
			Interval: Discrete 0.100s (10.000 fps)
			Interval: Discrete 0.200s (5.000 fps)
		Size: Discrete 640x480
			Interval: Discrete 0.033s (30.000 fps)
			Interval: Discrete 0.050s (20.000 fps)
			Interval: Discrete 0.100s (10.000 fps)
			Interval: Discrete 0.200s (5.000 fps)

~$ for d in /dev/video* ; do echo $d ; v4l2-ctl --device=$d -D --list-formats  ; echo '===============' ; done
/dev/video0
Driver Info:
	Driver name      : uvcvideo
	Card type        : USB Video: USB Video
	Bus info         : usb-0000:02:03.0-1
	Driver version   : 5.15.99
	Capabilities     : 0x84a00001
		Video Capture
		Metadata Capture
		Streaming
		Extended Pix Format
		Device Capabilities
	Device Caps      : 0x04200001
		Video Capture
		Streaming
		Extended Pix Format
ioctl: VIDIOC_ENUM_FMT
	Type: Video Capture

	[0]: 'MJPG' (Motion-JPEG, compressed)
	[1]: 'YUYV' (YUYV 4:2:2)
===============
/dev/video1
Driver Info:
	Driver name      : uvcvideo
	Card type        : USB Video: USB Video
	Bus info         : usb-0000:02:03.0-1
	Driver version   : 5.15.99
	Capabilities     : 0x84a00001
		Video Capture
		Metadata Capture
		Streaming
		Extended Pix Format
		Device Capabilities
	Device Caps      : 0x04a00000
		Metadata Capture
		Streaming
		Extended Pix Format
ioctl: VIDIOC_ENUM_FMT
	Type: Video Capture
while() loop in the setup section. For now (note: this changed a LOT)#define killSwitch 1 //defines switch pin void setup() { pinMode (killSwitch, INPUT); //initializes killSwitch pin as input while (digitalRead(killSwitch) == HIGH) //if switch is pulled to ground, loop infinitely { delay(1); } // or in one line: while (digitalRead(killSwitch) == HIGH) {delay(1);} }
killSwitch to LOW first. This is more of a peace-of-mind debugging thing that would likely be removed or altered (internal switch, or something) on a production device.//at beginning of code: #define killSwitch 11 //defines switch pin // in void setup(): pinMode (killSwitch, INPUT_PULLUP); //initializes killSwitch pin as input while (digitalRead(killSwitch) == HIGH) {delay(1);} //loop infinitely until switch is pulled to ground
An ultra-compact CoreXY 3D printer design with a 35% smaller footprint and 50% smaller overall volume than the Voron V0 with the same usable print size
Quickly-built foam cutter for cutting RC plane wings
Co-led a club competition team to placing 2nd overall in our category at SAE Aero Design West 2025 (Micro Class)